software that empowers your team

software that empowers your team


Use the Visual Style Manager to change the colors of the application screens as well change the way mandatory or required data input fields are displayed in the application. DynaStar™ allows each user to have their own Look and Feel to the application, remembering these settings on a user-by-user basis.
DynaStar™ has several view (or interface) styles that a user can choose from:
These styles match the chnages in the Microsoft Office user interface over the years. Each DynaStar™ user can set the view style they prefer. Whenever a user logs into the system, DynaStar™ will apply the user's view style of choice.
To set the View Style:
 ), then
DynaStar™ allows each user to set the way a mandatory or required data entry field looks in the application. This setting allows a user to customize the Look and Feel of the application and these settings are remembered on a user-by-user basis. Changing this setting does not affect how any other user sees the application.
1. Click the APP Menu (DynaStar button ), then
2. Click Visual Style,
3. Click Required Fields.

4. The Required Field Style dialogue opens showing the current style
Three items are changeable as shown in the example below
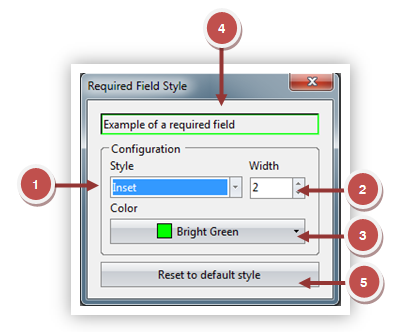
1. The Border of the field can be changed from the default Solid to another style.
2. The width of the border can be changef from the default 2 to another value (thinner/thicker).
3. The colour of the border can be changed from the default Black to another colour.
4. The changes being made are shown at the top of the dialogue window.
5. Quickly reset the changes back to the default values by clicking the Reset to default style button.
Apply and Save Changes by just closing the Required Field Style dialogue by clicking the Exit/Close button in the top right hand corner of the dialogue.
In the example below the Mandatory / Required data entry fields have been changed to a Red Dotted outline.